This tutorial will teach you how to upload files using the FTP program FileZilla, and then how to manage those files and folders. You should have already configured your web site in FileZilla, if you are having problems doing this, please view the tutorial "Configuring your web site in FileZilla".
For the purpose of this tutorial, we will assume you already have FileZilla running on your computer, and are connected to a remote server. 
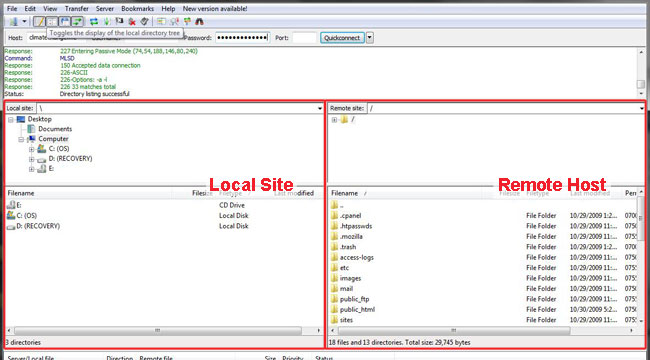
The FileZilla main screen is divided into three panels. The top panel is a running record of every command and the response of the server. It allows you to verify that any action you are performing has been completed successfully. Below that are two screens. The left screen is your local site. The right screen is your remote host, or your web site.
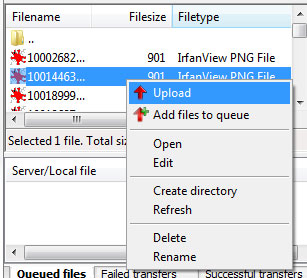
Let's look at how to upload, or transfer, a file to a remote server. In the left hand window ( which is your local site), under the list called Filename, select a file you would like to upload. To select multiple files, press the CTRL (Control) key on your keyboard while making your selections. Right click the selected file(s). This will open a menu. Click on Upload. That is all there is to it. If you look in the right hand window (the remote server) you can see the files have successfully been uploaded.
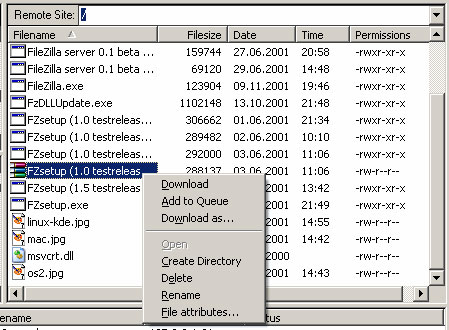
To download a file(s) from the remote server to your local site, right click on the file you wish to download. When the menu opens, select Download. The file has now been downloaded, and can be seen in the list of files on the left hand side, in your local site.
You now know how to transfer, or upload and download files from a remote server using the FTP program FileZilla. Now let's learn how to manage files.
To create a File in the Remote server, Right click anywhere in the remote server window. This will open a menu. Click on Create Directory. A window with a box will then pop up, asking you to enter a name for the new folder. Enter the name where it is highlighted. Then click OK. You have now created a new folder and it can be seen in the remote server window.
To rename a folder, in the remote server window, right click on the folder name. From the drop down menu, select Rename. Enter the new name of the folder in the highlighted box. The folder has now been renamed.
To delete a folder, right click on the folder name. From the drop-down menu, select Delete. The folder is now deleted.
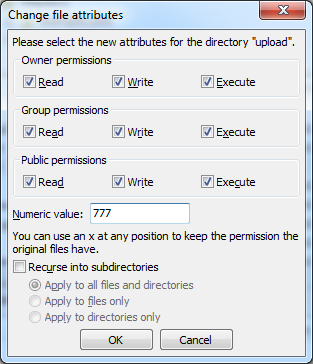
Now we will learn how to change file permissions. Find the file you wish to change permissions for, and right click on the file name in the remote server window. From the drop-down menu, select File Attributes. This will open a window called Change the attributes. It shows all the available attributes for each level of permission. (Read, Write, and Execute in Owner Permissions, Group Permissions, and Public or World Permissions) You will change them by clicking in the box of the ones you wish to change. When you are finished, click OK. That will take you back to the main screen.
This ends the tutorial. You can now also manage files and folders in FileZilla, including creating and renaming new folders, deleting folders, and changing file permissions.
- 2 Users Found This Useful

